


Building the Ultimate Teardrop Camper, Part 2: Trouble in Bear-a-dise
We left off last time with a dream to build the ultimate teardrop camper. The project, lovingly referred to as the Bear Pod, is now well underway, but budget and time started to squeeze the team like the vice grips holding the walls in place.
It was one of those coveted January Colorado days where the sun’s rays reminded you that the world was not a frozen wasteland. Neil, Chris, and John’s dad, had the doors to his workshop wide open, welcoming the warm Colorado sun. John, shop-pup Nina, and I pulled up into the driveway with our camper, the Foxy Lady in tow. Today, we were going to raise the walls before heading down to the Sangre de Cristo’s for a little New Year’s celebration.
One Wall at a Time
We arrived on the scene just in time to lend a hand with the first wall. Since the foundation, or trailer base, was pre-existing, each piece of framing was meticulously custom-measured to insure a square fit. Any mistakes here would carry on throughout the project. The art of framing expresses the balance between rough cuts of wood and precise measurements.

Raising the walls is a team effort. The cornerstones of the wood frame are set in place by Neil, John, and Chris. Photo Credit, Courtesy of: Meg Atteberry.
In order to save on costs, Chris opted to split two by six boards to create two-by-three framing elements. It meant more time, but it also costs significantly less. When every penny counts, it’s worth the extra time in front of a saw.

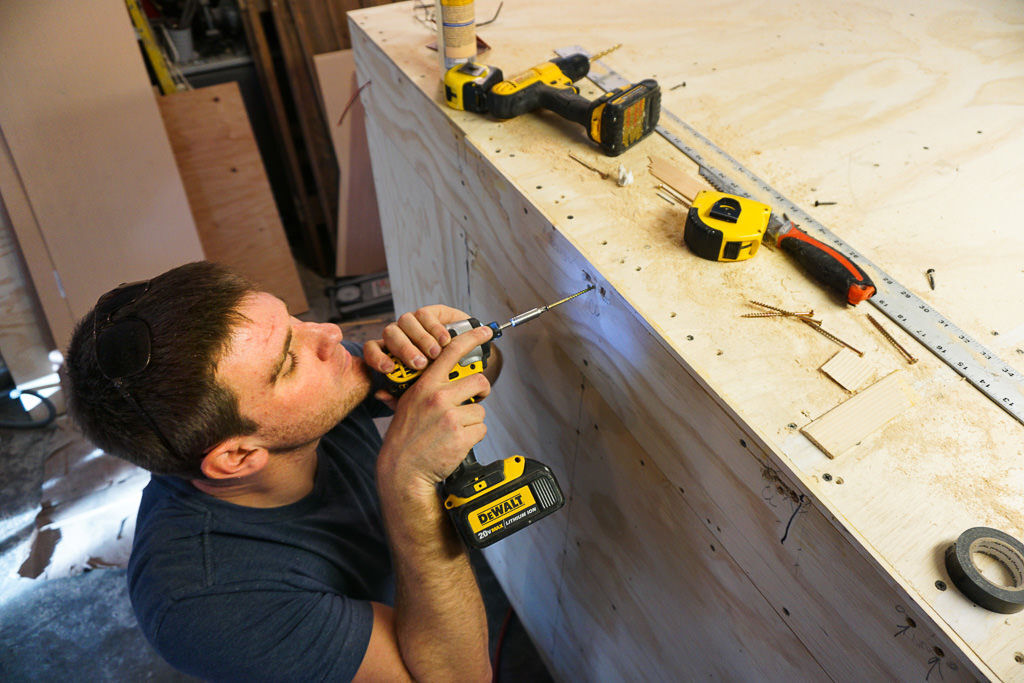
Chris cuts framing elements to exact size in Neil’s shop. Photo Credit, Courtesy of: Meg Atteberry.
Prior to framing, Chris took care of a few details behind the scenes. He needed to know the size of the windows and doors. In framing, we call this the rough-opening. However, unlike the windows in a house, these openings have rounded edges, making the framing a bit tricky.
Swing and a Miss at the Local Salvage Yard
Originally, we had planned to scour camper salvage yards in search of windows and doors that would suite the Bear Pod. However, only one such salvage yard exists, Five Star RV Center. Hopeful, Chris made the trek to the yard in search of a few pricey items. All he found were highly inflated prices and a shop owner who refused to bargain. For only $30 more you could buy new doors and windows.
The strike-out created a bit of a blow to the budget. Combined, the doors and windows cost $980. In order to get around the looming price tag, we decided one $400 door would have to suffice.
But big dreams don’t die easily, instead of forgetting the extra door and window, we simply framed for them and sheathed over them. That way, when Chris found the right deal, or struck gold with the raise he anticipated, he could quickly go back and install the windows later.
By the day’s end, we had the Bear Pod framed and ready for insulation. John and I headed for the trailhead with plans to return the following day.
The Foxy Lady: Bear Pod’s Big Sister

The Bear Pod as seen next to his big sister, the Foxy Lady. Photo Credit, Courtesy of: Meg Atteberry.
It turns out, the Foxy Lady played an integral role in the design of the Bear Pod. Since we had a basic teardrop camper model, it wasn’t uncommon for Chris to pop over on a weeknight and take a quick measurement off of ours. Even though, side by side, they are different dimensions, many of the Bear Pod’s ergonomics were based off of the beloved Foxy Lady.
Tensions Rise as Time Flies
Meanwhile, back at the workshop, Chris and Neil were busy installing plywood. With the interior plywood installed, the Bear Pod had enough stability to stand up without the help of bar clamps (think giant pipes with ledges on each end). She slowly grew her sea legs.

Hard Foam insulation is painstakingly installed. Each pocket between the framing needs to be insulated. Hard foam sheets were cut to specific size. Photo Credit, Courtesy of: Meg Atteberry
Next, came the electrical trim out. Then, the tedious task of custom-cutting hard foam insulation. Each pocket of framing needed to be insulated, otherwise, the camper works no better than a tent to keep you warm.

Chris and Neil, Chris’ dad, install the plywood sheething that gives the teardrop its lateral support. This is also the current interior finish. Photo Credit, Courtesy of: Meg Atteberry
Project Bear Pod drummed along, and like all long, intensive projects the burnout raised its ugly head. On one particular day, tempers flared over a minor imperfection and a sharp squabble between Chris and Neil erupted. But like all close family, the quips were quick, and all was soon forgotten. However, the small incident marked the beginning of the struggle-fest.
Bad News Comes in Three’s
Sometimes, life acts like a set a dominos, one thing happens and soon you’re left with a cascading mess of issues. You don’t even know where to start.
The axel was the first item to protest. As the Bear Pod took shape, it became apparent that the weight of the new trailer did not distribute enough weight to the tongue, or where the trailer connects to the car. At first glance, the only option was to move the tires back on the trailer. This required an extensive amount of welding, something none of us had enough experience with to accomplish comfortably.

Chris, a journeyman electrician, gets to work with the insulation, making sure to keep electrical wires in place. Photo Credit, Courtesy of: Meg Atteberry
The back hatch also presented a problem. How and where would we find one? The Foxy Lady had plenty of problems with the back hatch and we had learned that the design needed to be robust.
Lastly, the exterior skin. No one in the group had any idea about the most economical way to get an exterior skin that would last. We also had no idea how to best install it. Chris took a gamble and contacted Hiker Trailer. Hiker Trailer designs and builds teardrops locally. He sent in some dimensions, asked for a quote, and held his breath.
A Head Full of Doubt
The days slowly grew longer, and Chris began to doubt his ability to get it all buttoned up by April. His pockets were emptying, time ticked by and his motivation waned heavily. In order to distract himself and continue with the forward progress, he worked on building out the back kitchen. It came together quickly and quietly.
After a long day working on the trailer, Chris would collapse in a heap on our couch, beer in hand. Nervous, he would divulge his hesitations towards getting it done. There wasn’t much we could offer him, other than re-assurance that it would all work out the way it was supposed to.
Determined not to let it get to him, he pushed forward. Silence from Hiker Trailer didn’t help him fret about what to do with the exterior siding. The teardrop camper still had a wide-open backside with no solution in place and March crept closer and closer on the horizon.
Would the project be completed in time for the April trip? Or would money and misfortune ruin a campfire dream? Part III reveals the fate of the Bear Pod.
Get OutThere
Signup today for free and be the first to get notified on new updates.
PREV
PREVIOUS

Building the Ultimate Teardrop Camper, Part 1: The Best Ideas are Born Out of Fire
Facebook Twitter WhatsApp SMS Email Print Copy article link Save Facebook Twitter WhatsApp SMS Email Print Copy article link Save The fire hissed and popped. We sat quietly under the pop-up canopy, listening to the unrelenting pitter patter of rain that had been our sound track for the past few days. We read the weather […]
How One Man Became the First to Climb All of Colorado’s Fourteeners in One Winter
Facebook Twitter WhatsApp SMS Email Print Copy article link Save Facebook Twitter WhatsApp SMS Email Print Copy article link Save On his way to becoming a Colorado mountain legend, Andrew Hamilton has kept his head down. Charge to the top, charge to the bottom, drive to the next trailhead for the next 14,000-foot peak. Spot […]